Configure Agent MCP & Skill
After enabling MCP in TypeX Desktop, complete two more steps to get your AI assistant working with TypeX:
- Configure Agent MCP — connect your AI tool to the TypeX MCP endpoint
- Configure Skill — teach the AI how to use TypeX tools correctly
Both steps are required. MCP provides tool access; the Skill file provides workflows, confirmation rules, and error handling.
Endpoint: http://127.0.0.1:52222/mcp/
Configure Agent MCP
TypeX MCP uses Streamable HTTP transport. Point your agent at the local endpoint — no command, args, or env fields are needed.
Before configuring your agent, verify:
- TypeX desktop is open and MCP is enabled
- Your agent supports HTTP / Streamable HTTP MCP transport
The examples below are grouped by agent type. Start with general-purpose agents if you use TypeX for everyday messaging and automation. Developer-focused agents are listed separately for coding IDE workflows.
General-purpose agents
Claude Code
Claude Code is a terminal-based AI assistant for everyday tasks — messaging, scheduling, research, and automation.
Config file location:
| Scope | Path |
|---|---|
| Global (all projects) | ~/.claude.json → top-level mcpServers |
| Project (current repo) | .mcp.json in project root |
Steps:
- Create or open the config file for your chosen scope
- Add the
typexentry with"type": "http"(required for Claude Code) - Save the file
- Run
claude mcp listin the terminal and confirmtypexis listed - If missing, run
claude /doctorto check for schema errors
{
  "mcpServers": {
    "typex": {
      "type": "http",
      "url": "http://127.0.0.1:52222/mcp/"
    }
  }
}
Alternative — CLI one-liner:
claude mcp add typex --type http --url http://127.0.0.1:52222/mcp/
OpenClaw
OpenClaw is a personal AI agent that runs on your machine and connects to messaging channels, automations, and external tools via MCP.
Config file location:
| Scope | Path |
|---|---|
| Global | ~/.openclaw/openclaw.json → mcp.servers |
Steps:
- Open
~/.openclaw/openclaw.json(create it if it does not exist) - Add the
typexentry undermcp.serverswithtransport: "streamable-http" - Save the file
- Run
openclaw mcp listand confirmtypexappears - Start a new session (
/newin chat) or runopenclaw mcp reloadto pick up changes
{
  "mcp": {
    "servers": {
      "typex": {
        "url": "http://127.0.0.1:52222/mcp/",
        "transport": "streamable-http"
      }
    }
  }
}
Alternative — CLI one-liner:
openclaw mcp set typex '{"url":"http://127.0.0.1:52222/mcp/","transport":"streamable-http"}'
Hermes
Hermes is a general-purpose AI agent with persistent memory, scheduled tasks, and multi-channel messaging support.
Config file location:
| Scope | Path |
|---|---|
| Global | ~/.hermes/config.yaml → mcp_servers |
Steps:
- Open
~/.hermes/config.yaml(runhermes config editif unsure) - Add the
typexentry undermcp_servers - Save the file
- In the Hermes chat, run
/reload-mcpto apply changes - Ask the agent to list MCP tools and confirm TypeX tools are available
mcp_servers:
  typex:
    url: 'http://127.0.0.1:52222/mcp/'
Alternative — CLI one-liner:
hermes mcp add typex --url http://127.0.0.1:52222/mcp/
Developer-focused agents
These agents are built into coding IDEs. Use them if you already operate TypeX from your development environment.
Codex
Codex is OpenAI's coding agent integrated into IDE workflows.
Steps:
- Open Codex settings and navigate to the MCP server configuration section
- Add a new HTTP MCP server with URL
http://127.0.0.1:52222/mcp/ - Save and restart Codex if prompted
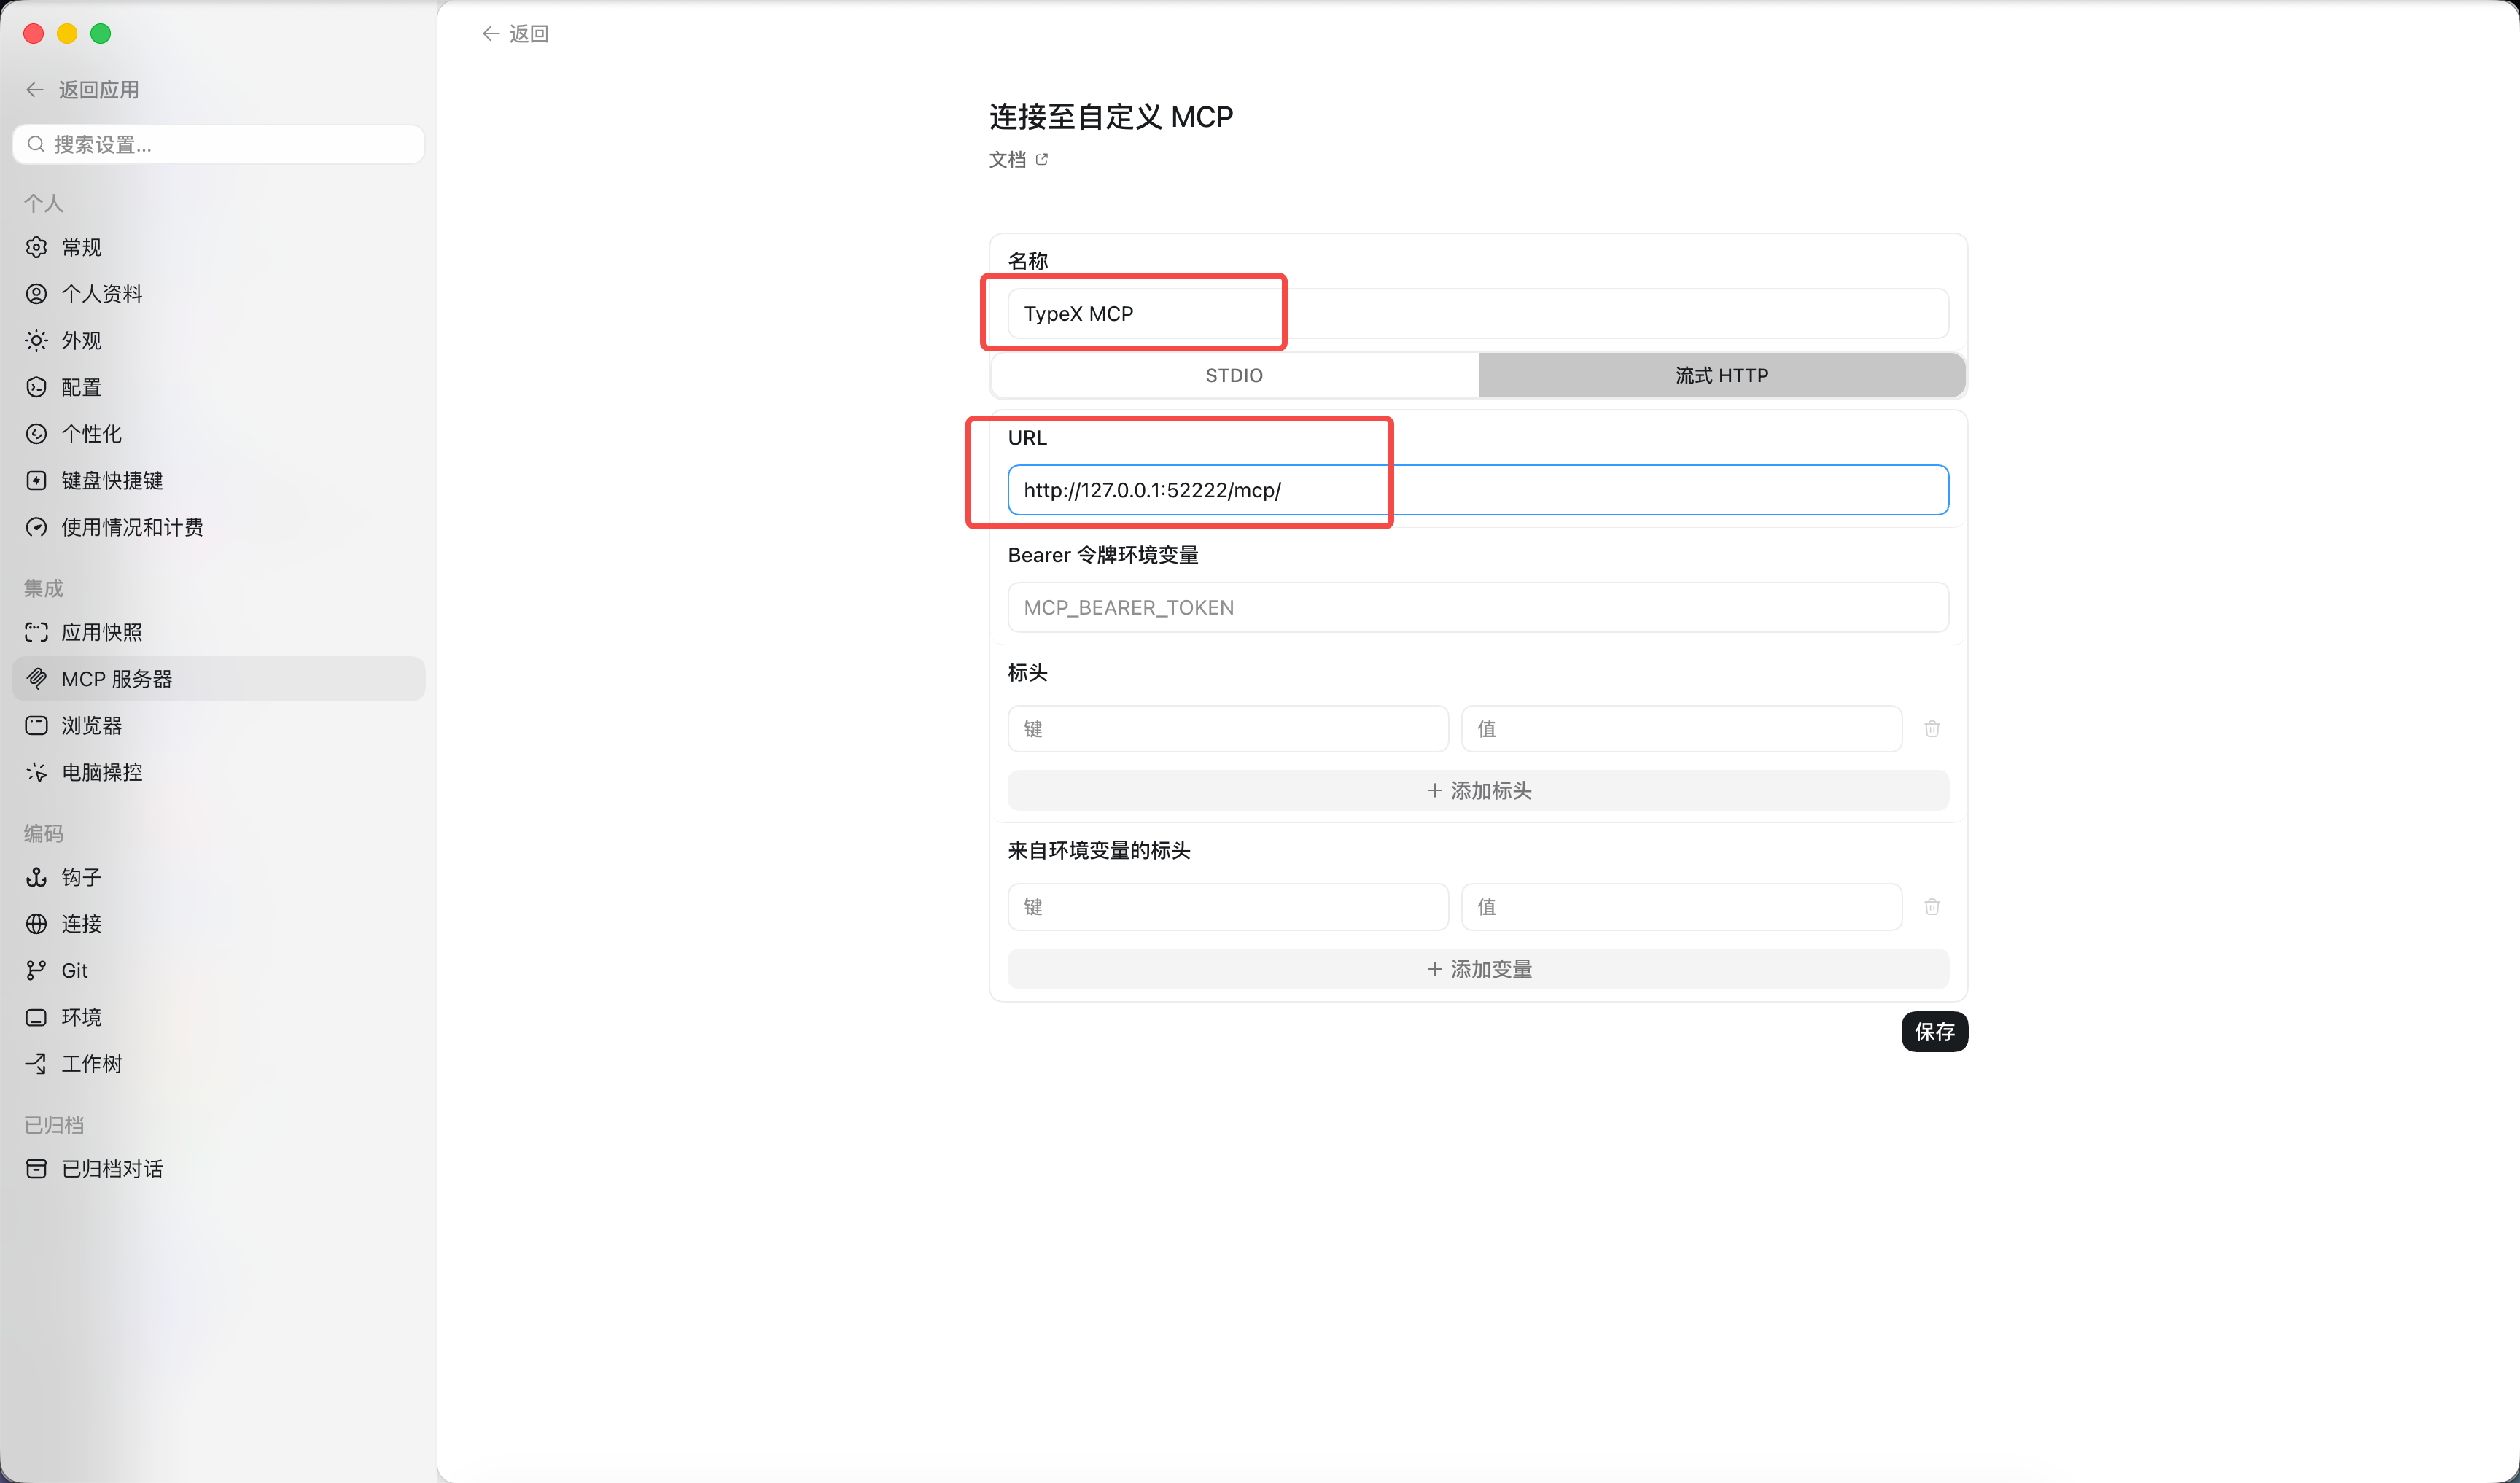
If your Codex version supports a JSON config file, use:
{
  "mcpServers": {
    "typex": {
      "url": "http://127.0.0.1:52222/mcp/"
    }
  }
}
VS Code (GitHub Copilot Agent)
VS Code with GitHub Copilot Agent is a coding-focused assistant with built-in MCP support.
Config file location:
| Scope | Path |
|---|---|
| Workspace | .vscode/mcp.json |
| User profile | Run command MCP: Open User Configuration |
Steps:
- Run MCP: Open Workspace Folder MCP Configuration (or the user-scope command above)
- Add the
typexentry underservers(VS Code usesservers, notmcpServers) - Save the file
- Open the Chat panel → check that TypeX MCP tools are available under MCP servers
{
  "servers": {
    "typex": {
      "type": "http",
      "url": "http://127.0.0.1:52222/mcp/"
    }
  }
}
Other MCP-compatible agents
IDE extensions such as Cursor, Trae, and Cline also support MCP. The JSON shape varies slightly by tool:
| Agent | Config path | HTTP field |
|---|---|---|
| Cursor | ~/.cursor/mcp.json or .cursor/mcp.json | url |
| Trae | .trae/mcp.json | url |
| Cline | Cline panel → Configure MCP Servers | url + "type": "streamableHttp" |
Generic template (works for Cursor, Trae, and similar):
{
  "mcpServers": {
    "typex": {
      "url": "http://127.0.0.1:52222/mcp/"
    }
  }
}
Some agents require extra fields — e.g. Claude Code needs "type": "http", VS Code uses servers instead of mcpServers. Check your agent's MCP documentation and adjust field names accordingly.
Configure Skill
The Skill file teaches your AI how to use TypeX MCP tools — search-before-send workflows, confirmation rules, ambiguity handling, and error recovery. Without it, the AI has tool access but may skip important safety checks.
Download the Skill File
The file contains YAML frontmatter (name: typex-use) and detailed usage instructions. Keep the frontmatter intact when importing.
Import the Skill
General approach (all agents):
- Download the Skill file (link above)
- Place it in your agent's skill / rules / instructions directory (see per-agent paths below)
- Rename to
SKILL.mdif your agent requires that filename - Restart or reload your agent
General-purpose agents
Claude Code
- Open
~/.claude/CLAUDE.md(global) orCLAUDE.mdin your project root - Append the full content of the downloaded Skill file under a
## TypeX MCPheading - Save the file — Claude Code reads
CLAUDE.mdon startup
OpenClaw
- Create the skill directory:
mkdir -p ~/.openclaw/skills/typex-use
cp ~/Downloads/typex-mcp-skill.md ~/.openclaw/skills/typex-use/SKILL.md
- Optionally enable it in
~/.openclaw/openclaw.json:
{
  "skills": {
    "entries": {
      "typex-use": {
        "enabled": true
      }
    }
  }
}
- Start a new session (
/new) and runopenclaw skills listto verify
Hermes
- Create the skill directory:
mkdir -p ~/.hermes/skills/typex-use
cp ~/Downloads/typex-mcp-skill.md ~/.hermes/skills/typex-use/SKILL.md
- Alternatively, append the Skill content to
~/.hermes/SOUL.mdunder a## TypeX MCPheading - Start a new Hermes session to pick up changes
Developer-focused agents
Codex
Import the Skill file as a custom instruction or project-level agent config in Codex settings. Paste the full Markdown content into the instructions field.
VS Code
- Create or edit
.github/copilot-instructions.mdin your project root (workspace scope) - Paste the full content of the downloaded Skill file
- Save and start a new Copilot Agent session
Other agents
| Agent | Skill import path |
|---|---|
| Cursor | ~/.cursor/skills/typex-use/SKILL.md |
| Trae | .trae/project_rules.md in project root |
| Cline / Roo Code | Extension Custom Instructions settings |
Verify Your Setup
Check MCP connection:
Ask your AI to list available MCP tools. You should see TypeX tools such as message search, send message, and group management.
Check Skill integration:
Try a prompt like:
"Search my TypeX groups for product discussions"
Expected behavior:
- The AI searches before acting (does not guess group names)
- Multiple matches → asks you to choose
- TypeX is not running → reports a clear error and suggests enabling MCP in Settings
If MCP tools appear but behavior is wrong, the Skill is likely missing — complete the Skill configuration above.